
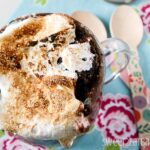
Chocolate Fudge S’mores is the epitome of awesomeness. A layer of graham cracker crumbs (digestive biscuits), smothered in a gooey moist chocolate cake, then topped off with ooey gooey roasted marshmallow fluff – all in one mug!

Hi all! It’s Lisa from Sweet 2 Eat Baking. How are you all? I hope you had an awesome July and are still rocking out this summer. I know I have, I don’t want summer to end… ever! 😆
I like to extend as much summer as I can, for as long as I can. And since the weather will soon start to change – heck, in England I’d be lucky for at least some ‘warmness’ in August, ha! – I wanted to make another super-de-dooperly quick and easy dessert for you guys to enjoy.
I decided on a Chocolate Fudge S’mores. And it comes in a mug. You’ll feel special! 🙂

Let’s talk about this Chocolate Fudge S’mores, shall we? I wouldn’t call it a mug cake at all, I’d say it’s more a combination of a super moist cake / pudding.
You know what’s crazy? I had never even tried S’mores until now! I know, I know… it’s more of a US thing and being a Brit, s’mores isn’t really that heard of here.
So it’s funny how I rectify my s’mores experience by completely skipping the regular s’mores and diving in headfirst by creating a s’mores in a mug instead.
#thatshowiroll

To make this chocolate fudge s’mores, you start with graham cracker crumbs (digestive biscuits in the UK), push those crumbs into a mug. Then making that gooerrific chocolate batter and smothering on top of the graham crackers. Then finally topping with marshmallow fluff and cooking in the microwave.
Voila! …one amazing s’mores! You can even go as far as roasting the marshmallows under the grill or by using a kitchen torch, like I did.

This s’mores recipe also utilises on store-cupboard staples and it ridiculously easy to make. No need to light that campfire though!
Chocolate Fudge S'mores
Ingredients
- 4 tbsp butter
- 4 tbsp unsweetened cocoa powder
- 1 large egg
- 4 tbsp milk
- 6 tbsp granulated sugar
- 6 tbsp self-rising flour
- 60 g 2.1 oz graham cracker (digestive biscuit) crumbs
- 4 tbsp marshmallow fluff
Instructions
-
Add the graham crackers or digestive biscuits to a food processor and pulse until crumbs form. Set aside.
-
Add the butter to a small bowl and heat in the microwave for 20-30 seconds, or until melted.
-
Sift in the cocoa powder until combined, then add the egg and milk and beat with the fork until combined.
-
Next, add the sugar, flour and salt and beat again until smooth.
-
Divide the crushed crackers or biscuits into two 350ml (approx. 1½ cup) sized mugs and press down. Divide and spoon the batter over the top, then carefully top with the marshmallow fluff.
-
Cook in the microwave for 1 minute 30 seconds (1000W) or up to 1 minute 45 seconds (800W or under).
-
Once cooked, use a kitchen torch to roast the marshmallow fluff or alternatively, place under the grill to roast - optional.
-
Serve immediately.
Love this recipe? Why not hop on over to my blog, Sweet 2 Eat Baking, to find more delicious desserts, including some British classics.
You can also follow me on Facebook, Twitter, Pinterest, Google Plus and Instagram. Or sign up to receive email notifications.
See you next month!
Lisa xoxo
If you love cooking mug-sized treats, then you’ll want to visit these posts on OSSS, too:
No Bake Lemon Curd Cheesecakes
Pumpkin Chocolate Chip Mug Cake
And some delicious Frozen Hot Chocolate to celebrate the last couple of weeks before school starts!