

Lisa, the author behind Lisa’s Craft Blog, is a disabled military wife who adores arts, crafts and blogging. She frequently shares new craft tutorials and DIY projects as well as a lot of other craft-related information. Lisa’s Craft Blog constantly hosts events that encourage readers and fellow bloggers to participate, such as weekly and holiday-themed linky parties, crafty giveaways, and more.

Have you seen the small Zakka Owls that are about 4 inches tall? This tutorial will show you how to make a BIG 1-foot Zakka Owl Stuffie!! This is a great stuffed animal that you can give to a child or anyone that loves owls.
SUPPLIES
1/2 yard – Soft fabric for body
1/3 yard – Coordinating soft fabric for belly
1 sheet – White felt
2 sheets – Felt for eye patches and bottom
2 – 1″+ Black buttons
Embroidery floss
Large-hole sewing needle
Step 1: CUT FABRIC
This is the trickiest part of this project because you’re going to have to free-hand this pattern onto your fabric. Then again, you could take the pattern to a professional printer to have it enlarged if you really wanted to.
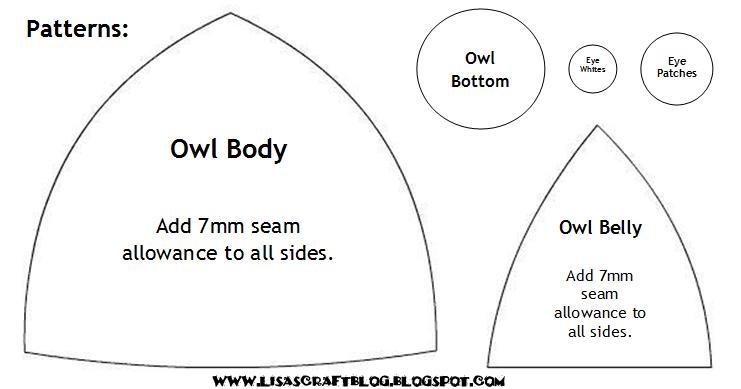
The pattern can be downloaded HERE.
Free-hand the patterns onto your fabrics.
The Owl Body should be about 18″ tall and the Owl Belly should be about 10″-12″” tall.
Note: When free-handing the pattern, it doesn’t have to be exactly like the pattern. The most important thing to is that Owl Belly piece is about 2/3 as tall as the Owl Body piece.
Step 2: BEGIN TO SEW BODY
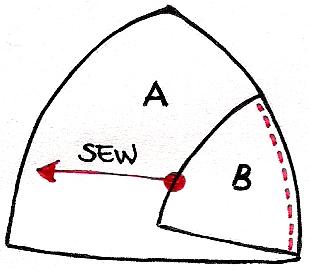
I like to use 3 of the 6 threads in embroidery floss and I use a back-stitch for this step, but you’re welcome to use a sewing machine instead.
With the wrong sides of the fabric facing each other, sew the edge of the Owl Belly (B) to the right edge of the Owl Body (A) starting at the bottom corner.
Tie a knot when you reach the upper point of the Owl Belly (B) and cut your string.
With the wrong sides of the fabric facing each other, sew the edge of the Owl Belly (B) to the right edge of the Owl Body (A) starting at the bottom corner.
Tie a knot when you reach the upper point of the Owl Belly (B) and cut your string.
Step 3: CONTINUE TO SEW BODY
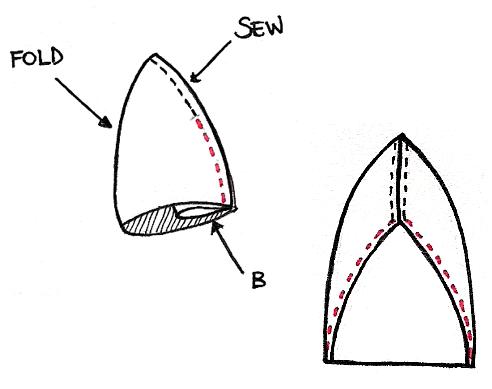
Repeat Step 2 on the left side of the Owl Body (A), just as you did on the right side, but do not tie a knot or cut your string.
Fold your fabric down the center as in the image above and continue sewing up to the top of the Owl Body (A).
Tie a knot and cut your string.
When finished with this step, unfold your piece and it should look similar to the second sketch in the image above
.
Step 3: CREATE HEAD

Turn fabric right side out.
Fold just below the red line and stitch the top point (red dot) to the owl’s belly.
Note: When sewing the point to the belly, make sure it is centered, left-to-right, otherwise your owl will have a crooked beak!
Step 4: ADD EYES
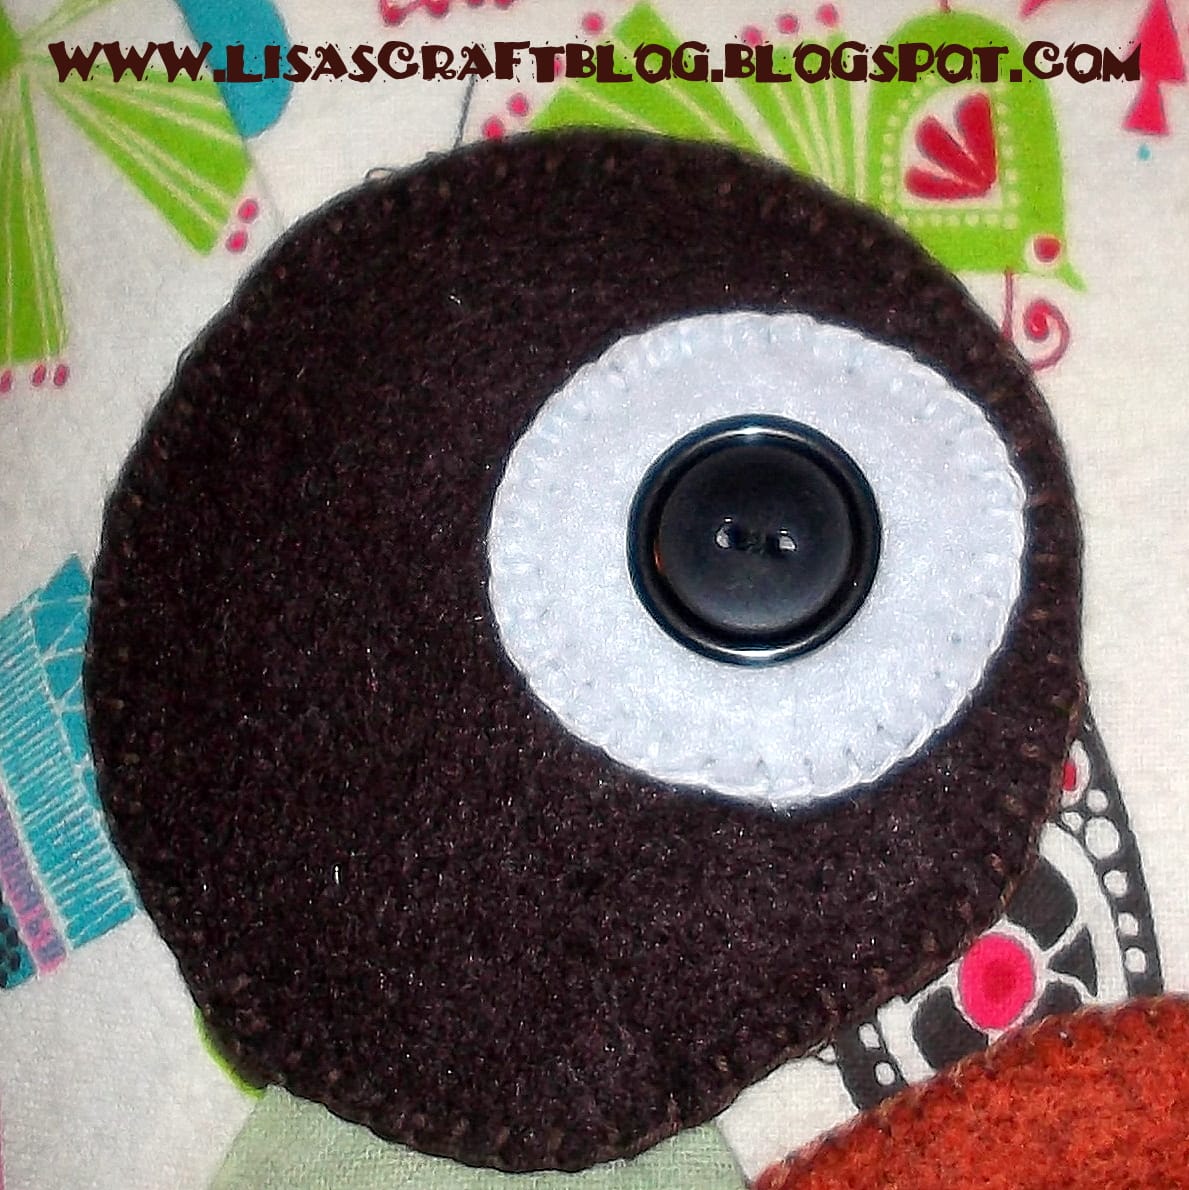
EYE PATCHES
Prior to sewing on the eye patches, pin them in place so they will be level and equally apart.
Use 6 threads of coordinating embroidery floss and sew a blanket stitch around the eye patches.
EYE WHITES
Pin the whites of the eyes close to the inside edge of the eye patches, but don’t cover your nifty blanket stitch.
Use 6 threads of white embroidery floss and sew a blanket stitch around the eye whites, just as you did the eye patches.
EYE PUPILS
Sew the black buttons in the center of the eye whites (for a wide-eyed look).
You can also sew the buttons toward the inside (for a bit of a cross-eyed or confused look), or even out to the sides (for a crazy look).
Step 5: ADD BEAK
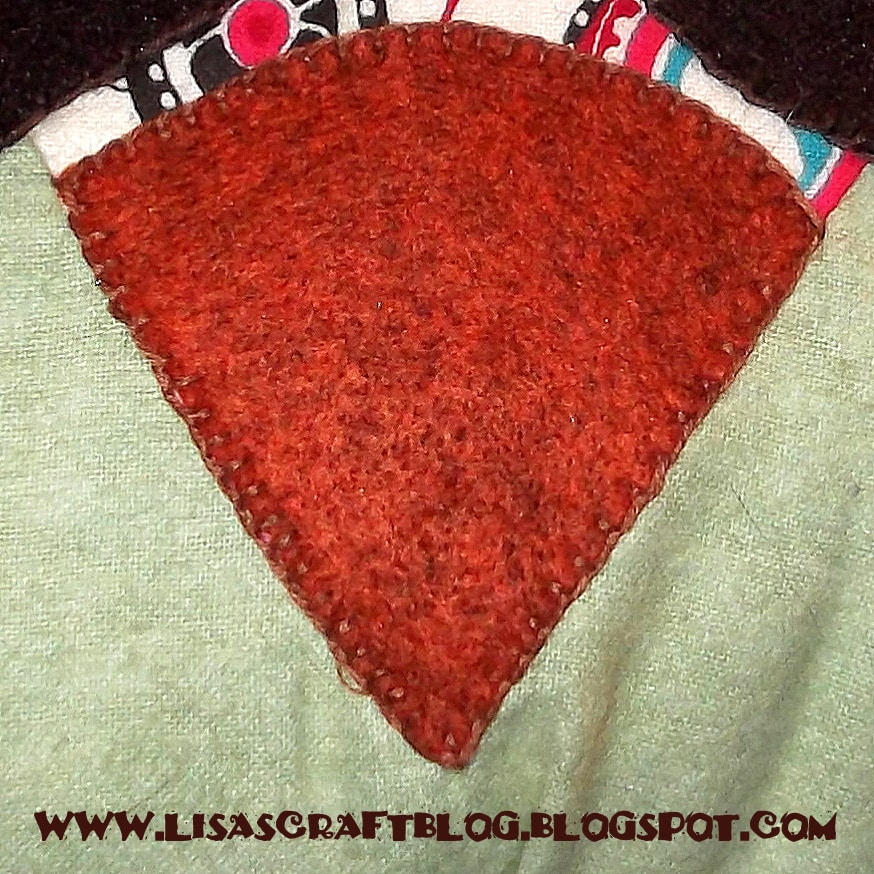
Cut a piece of orange/brown felt to cover the folded down point.
Pin it in place and blanket stitch around the entire beak using 6 strands of coordinating embroidery floss.
Note: I rounded the top of the beak for this owl, but you could always experiment with different looks too.
Step 6: SEW BOTTOM

Sew a running stitch around the base of the owl, about 1/4″-1/2″ away from the bottom edge.
Pull the thread in order to create a hole that’s about 4″-5″ in diameter.
Tie a knot, but don’t cut the thread.
Stuff with PolyFill.

Using a running stitch, sew the Owl Bottom to the base of the owl making sure to cover the cinched stitches.
FINISHED!!

Thanks for reading!!
