Hello there! My name is Nichole. I am a proud new momma to a sweet baby girl who is now 6 months old. Playing with her all day is my new passion, along with squeezing in time for blogging, crafting, Oprah, and chocolate (all the essentials of course!). Thanks for letting me stop by and share my idea with you.
A little while ago I decided I needed a solution for my mess of a jewelry box. There were a lot of ideas out there but the one I settled on is both organized and very nice to look at. It’s practically the center piece to my bedroom.
See for yourself:
BAM! Isn’t it beautiful? It’s the first thing I see each morning when I wake up and every time it makes me smile. And I have to admit since this jewelry frame came into my life I have been wearing jewelry much more often, which is always a good thing.
So, how do you make a framed fabric board jewelry organizer for yourself?
Lemme tell ya. (disclaimer: If I can make it ANYONE can!)
Supplies you will need: 1. a picture frame, any size- I used 8×11 2. a piece of foam board-same size as frame 3. a piece of batting- 8×11 approx. 4. a piece of fabric 8X11 approx 5. some chicken wire 6. a stapler, or a staple gun 7. some duct tape
Step 1. First find a frame. I looked and looked for a great antiquey frame but finally gave up and just used a white one I had from target. It is an 8×11, which for the amount of jewelry I have has proven to be a perfect size. Take out the glass and put it aside. (someone needs to come up with something fabulous for us all to do with all our pieces of glass we will have lying around after this!)
Step 2.Then I took some foam board-you could also use a cork board, and maybe even cardboard and cut out a square a little smaller than 8×11. I think I traced the paper that comes in the frame.Step 3. Then I cut out a piece of batting that would be big enough to wrap around the back. I simply stapled it with a normal stapler around the foam board. (the more staples the better.)
Step 4. Then I did the same thing (as step 3) with my fabric. I just folded it around the foam board and stapled it, pulling it tight in the back. I just cut a rough piece, don’t worry about straight edges or anything. (I obviously didn’t!) The important thing is to just make sure it is pulled tightly so it is smooth in the front.
Step 5. Do the same exact thing that you did with the batting and the fabric with your piece of chicken wire. I got a roll from Home Depot. Ask if they have scraps you can get for cheap, because you don’t need very much. Then cut it using wire cutters if you have them, or ruin a good pair of scissors like I did. And just form it around the foam board. It bends pretty easily, be careful though, it’s pretty pokey! It should just stay by it self, just push on the wire so it tightens around the board.
Step 6. Now for the slightly ghetto part, I told you I am no professional! So next I placed the whole piece of foam board with all the layers wrapped around it into the frame. You kind of just have to push it in there. The problem is that it’s pretty thick at this point and so it juts out from the normal glass space provided. So what’s a girl to do? Whip out the duct tape and just make that back stick to that frame! ha! You could try hot gluing maybe, there may be better ways, but duct tape has worked great for me and no one see’s the back anyway! (just put on a lot!)
And voilà! I use it to hang my earrings on the chicken wire and my other stud earrings just stick right into the batting and foam board. (I store the backs in a little jewelry box on the dresser)
Then for my necklaces I just unhook and loop them around the chicken wire at the bottom. You could even take necklaces that don’t have hooks and just kinda make them stay by looping them through. (nothing with too big of beads though) Or I have seen some people put little nail pegs around the frame to hang necklaces.
You can make this as big or small as you want. I think it’s a great way to organize your jewelry and looks really cute! Good luck! I can’t wait to see what you all create!
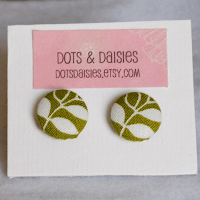
And… if you need some fabulously chic and unique earrings to spice up your new jewelry frame you can find some at my recently opened etsy shop Dots and Daisies . Wouldn’t these look fabulous on your new piece of bedroom decor?
For gift ideas for everyone on your list, check out the Gift Ideas tab and be sure to pin Gift Idea Central, to keep the whole collection in one place.
So creative!! Thanks, Nichole!
I love this!
Thanks for the great tutorial. Now I actually have confidence to try it!
Nichole!!!Go You!!!! amazing!
Thanks for the tutorial!! LOVE it!
Cute and simple!
Nichole, your post was so fun and cute! And the jewelry holder looks easy to make and super useful.
Totally going to make this! Thanks!