Do you ever get together with your friends just to craft? Tackle DIY projects with your better half? Bake cookies with your kids?
If you answered yes to any one of those questions, high five!
If you answered no, then I urge you to try it sometime. You see, not only is it fun, but I find I am so much more creative when I can glean inspiration from the people around me. And just as iron sharpens iron, my suggestion to whitewash the wardrobe leads Mark to suggest we layer it atop a gray-wash, and we go back and forth and back and forth until we end up with something so much cooler than if we had been working Han-Solo. Ya know?
Well, if you’re not fully convinced, I have a story for you all today. And for the sewists in the house, it might also serve as the inspiration for your next sewing project.
This story takes place early this past summer in Overland Park, Kansas…in Robin’s Amazing Sewing Studio a.k.a. the Cave of Crafting Wonders.
Okay first, things first,
Fun Facts About Robin:
She is one of my MIL’s dearest friends
She gave Mark and me the most beautiful quilt for our wedding, which you can see here.
She could probably sew in her sleep. She’s that gifted.
So, my MIL planned a special trip for the two of us to visit Robin, and it just so happened to coincide with a production of “As You Like It” in Kansas City that my BIL Todd would be performing in. So, along with my lovely SIL Ashlee, the five of us joined forces for a crafternoon (or more accurately, a crafter-day). Our mission? To sew Origami Bags!
Operation Origami Bags!
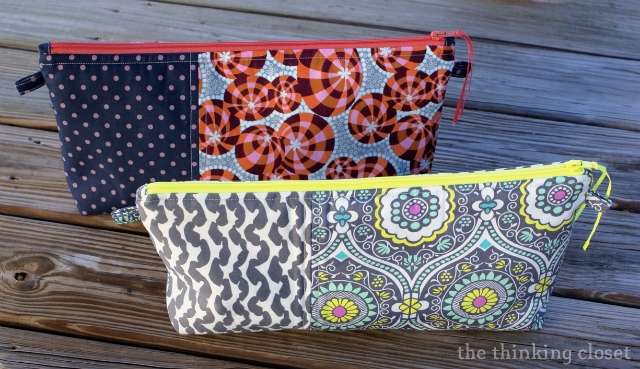
We used the Origami Bag pattern by Amy Butler from her book Style Stitches, which is so versatile because it comes with six different size options.
It’s also a fun creation because you can use this bag for anything from beauty products to travel items to sewing supplies. Robin even uses one to stash away the remote controls by the T.V.
Choices, choices…
My favorite part was also the toughest part: choosing fabrics! I mean, tell me you wouldn’t struggle to settle on fabric if you had all these yummy options to choose from:
And that’s not even scratching the surface of Robin’s fabric stash! So, after digging through the mountain of her Tupperware bins, I finally settled on three complimentary Amy Butler fabrics:
Then, it was time to choose a zipper, and I went bold with a hot yellow one. You only live once, right?
Robin already had two machines for us to use and borrowed a third from a friend, so three could be sewing while one person was ironing or pinning or {cough} seam-ripping. It’s almost like her Sewing Studio was built for crafternoons like these.
So, as the four of us dove into our Origami Bags, Robin was on stand-by to help answer our many questions. Thankfully, she has taught sewing and quilting classes for years and years, so she was really in her element!
Here are some of the tricks and tips we learned from Robin while working on our bags:
Sewing Tricks & Tips
Rotary Cutting
I’ve always struggled to get a clean cut when using a rotary cutter, but Robin gave us a few pointers that have vastly improved my rotary cutting game:
First of all, it takes practice! So practice on scraps first.
Keep the rotary cutter upright, using the index finger to apply good pressure against the fabric and the ruler at the same time.
No sawing motions allowed!
Keep your fingers in your line of sight at all times, not letting them accidentally slip over the edge of the ruler, in the way of the blade. Safety first, people.
Cut with confidence and a good amount of speed after your are sure of fabric and ruler placement.
You can start rolling a bit before hitting the fabric to ensure a clean cut from start to finish.
If cutting multiple pieces of the same shape, you can pre-mark your dimensions on your acrylic ruler using glow-line tape to save yourself time! Loved that tip.
Design Wall
One of my favorite parts of Robin’s Sewing Studio is her Design Wall, where she displays cut pieces of fabric to see how they look together (great when quilting) and just to keep track of them. And guess what? No pins needed! The fabric just sticks there on its own. Like magic!
How does it work? Well, the Display Wall is made from 2″ thick insulation foam board covered in extra wide flannel; the flannel is adhered to the board using spray adhesive and the board to the wall using liquid nails. The flannel just grabs cotton fabrics and enables you to move them around with ease. It was so much fun to use! And it ensured that the four of us didn’t mix up or lose our pieces while working.
Leaders & Enders
Robin first learned about the notion of using “leaders” and “enders” from Lolly Quiltz who learned it from Bonnie Hunter of Quiltville, and it rocked my world when she first told us about it. Essentially, you use a fabric scrap folded in half as a “leader,” sew across it, and then continue to sew onto the piece you’re working on. When finished, you sew straight off of it and onto an “ender” scrap. Then, your “ender” becomes a “leader” you can just keep going onto your next piece or spin around your fabric and head back down the other side as I did in the photo below. It saves you time trimming away the thread ends, and some even make entire quilts out of these “leader” and “ender” scraps! For a more comprehensive explanation, visit here and here.
Scissor Pull
You know how you’re always losing your tiny snips? Not any more! Not when they’re attached to you. In the midst of working, I felt a tug on my shirt, and Robin had popped by like a little fairy to clip a scissor pull (or scissor fob) to my shirt. I need to get me one of these for future sewing projects! Here’s a scissor pull in action on my sweet MIL:
Tips For Planning a Crafternoon
Okay, so when planning your next crafternoon, here are a few things to remember:
Stop to eat!
Our crafternoon ended up being practically an entire day, so, we really needed sustenance to power us through. Robin kept us well fed with a yummy breakfast from Einstein’s Bagels, soup for lunch, and gooey cookies for an afternoon snack. She spoiled us rotten!
Be Prepared to Make Mistakes
Don’t be discouraged when you make mistakes. And I say “when” instead of “if” because it’s bound to happen! Oftentimes, when we’re crafting with a buddy, we’re chit chatting, having a good time, it’s easy to get distracted and sew the wrong pieces together instead of the right ones (I may or may not have done that two times in a row!). So, if you end up taking a seam-ripper to an entire zipper, don’t despair. Just keep laughing, and embrace it as a crafternoon rite of passage.
Poor Mom had the biggest headache seam-ripping a zipper, which got half-eaten by her machine!
Remember to Have Fun!
Also, on the note of laughter, don’t forget to have fun! That means being goofy and wearing your Origami Bag as an infinity scarf…just because…why not?!
“In every job that must be done, there is an element of fun.” -Mary Poppins
Stretch Yourself
Stretch yourself to try new things! I would have probably never ventured to try the Origami Bag on my own because of the dreaded zipper installation. I had practiced one before, but that was many moons ago. However, Robin instilled in us such confidence, she walked us through that step with such ease, I couldn’t believe it when I finished my zipper and it actually zipped! Quite well in fact.
Ashlee tried working with laminated fabric for the inside of her bag, something she had never done before and something that can at times be tough to work with. But she conquered that, too! Like a rockstar!
Document the Day
Keep a camera or your phone nearby to snap pics of the fun times had! Not only is it a great way to commemorate the experience, but taking pictures of each step of the process helped me when I made a second Origami Bag weeks later.
Here we are with our successfully completed bags and our fearless leader, Robin!
Plan Your Next Crafternoon!
Also, as soon as you complete your first crafternoon, schedule a second one! My MIL and I knew that if we wanted to really cement our learning of new sewing skills, we needed to get together soon after our Kansas trip for a second crafternoon. And we did. It was a bit faster of a process the second time (though still, we felt like slow-pokes…and did have to make one emergency phone call to Robin).
Here we are with our second round of Origami bags, proud as can be:
And while that may be the end of my story, it’s the beginning of yours!
It’s Your Turn
So, dear reader, this is my charge to you:
Call up a friend with whom to try Origami Bags. Set a “date” with your significant other to paint that coffee table that has been collecting dust in the garage. Clear the kitchen table and have a project waiting for your kids when they get home from school. I dare say it may take your creative endeavors to new heights…while feeding the soul.
After all, this life was meant to be lived together. And you can quote me on that.
For More Crafternoon Projects…
…here are some of my favorites that resulted from a “crafternoon” with a loved one. Stop by The Thinking Closet to check them out!