
Hey Everyone, it’s Adelle from Packed with Fun, the official blog for Get Away Today. We are in the midst of summer and that means I scream, you scream, we all scream for ice cream! One of my favorite treats ever since growing up have been Mickey Mouse ice cream bars. I used to get them when the ice cream van would make its way through my neighborhood. Now we get them each time we visit Disneyland as a family. Because I believe in Disney magic at home, I figured out a fun and easy way to make our own Mickey Mouse ice cream bars. I first shared these on Packed with Fun, and they were such a hit, I wanted to share them here as well.
‘Ears what you’ll need:
Vanilla ice cream (in a cardboard container)
Milk chocolate chips
Coconut oil
Serrated knife
Popsicle sticks
Wax paper
Cookie sheet
Mickey Mouse cookie cutter
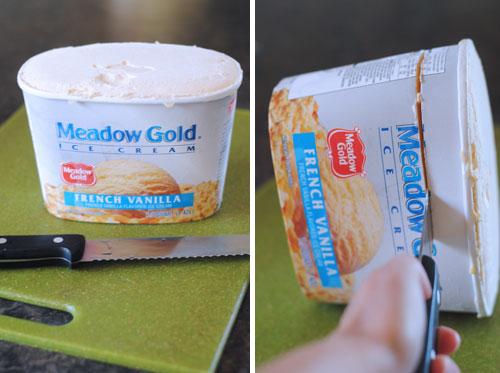
First you’ll cover your cookie sheet with wax paper and stick it in the freezer for at least 15 minutes. You want that thing COLD. Also, you want to start with really frozen ice cream. The firmer it is, the easier it will be to cut.
Once your ice cream is frozen solid, you’ll place the carton sideways on a cutting board and cut the entire carton full of ice cream into 3/4 inch slices using your serrated knife.
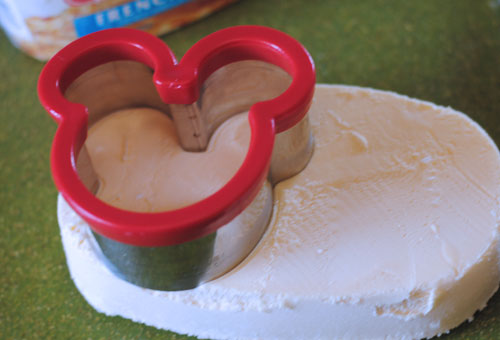
After each slice, you’ll peel away the cardboard and use your cookie cutter to make your Mickeys. I was able to get two Mickeys out of each layer.
As soon as your Mickeys are cut out, place them on your cold cookie sheet and insert your popsicle sticks as far as you can without ruining the shape of your Mickey. Because the ice cream melts quickly, you may want to stick them back in the freezer in between cutting your layers.
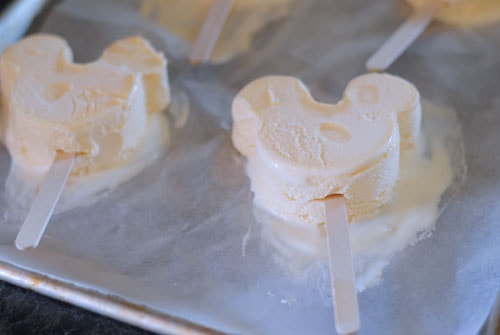
Once your Mickeys have all been cut out and have their sticks in place, stick them back in the freezer and let them set up for at least 30 minutes. While that is going on, you’ll make your chocolate dip.
Melt an entire bag of your favorite chocolate chips for about two minutes on a low setting, stirring every 30 seconds to avoid burning. Once the chocolate chips are smooth, add 3 tablespoons of coconut oil until the oil and chocolate are combined.
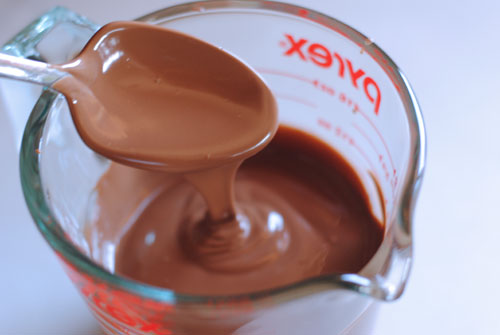
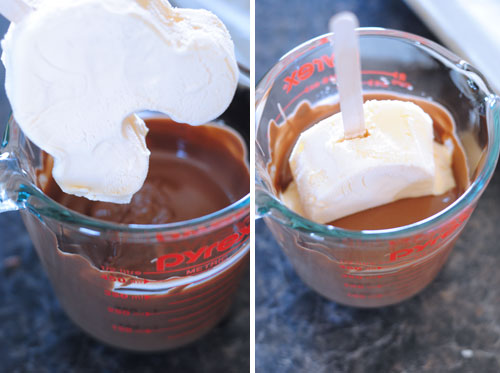
Let the chocolate cool to room temperature while stirring occasionally. You want the chocolate to be cool enough that it doesn’t melt your Mickeys and soft enough to dip your ice cream in to cover the ears. When it gets to this point, you are good to start dipping.
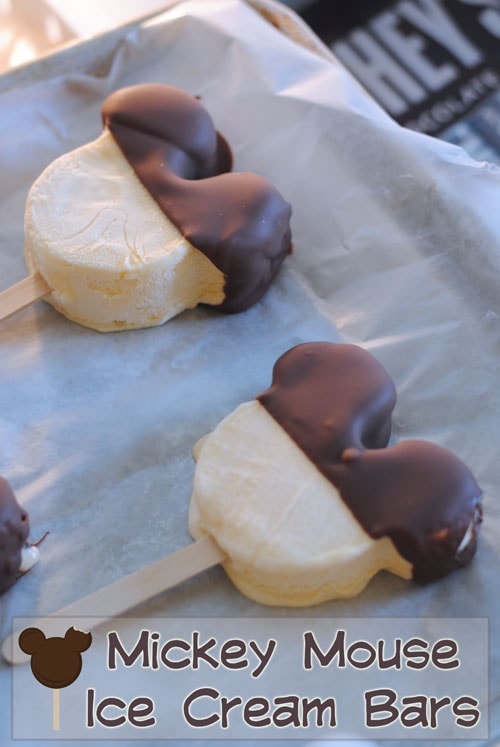
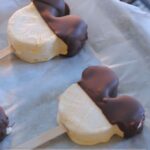
Dip your Mickey Mouse ice cream bars one at a time into the chocolate and place them onto a clean sheet of wax paper. The chocolate sets up pretty quickly and you should be good to start enjoying your Mickeys after about 20 minutes in the freezer.
If you’re making your Mickeys ahead of time, you can wrap each ice cream bar individually in plastic wrap after the chocolate sets to keep them fresh and prevent freezer burn. Our didn’t last that long. 😉

Mickey Mouse Ice Cream Bars - Make Your Own! (she: Adelle)
Ingredients
- Vanilla ice cream in a cardboard container
- Milk chocolate chips
- Coconut oil
- Serrated knife
- Popsicle sticks
- Wax paper
- Cookie sheet
- Mickey Mouse cookie cutter
Instructions
-
Cover cookie sheet with wax paper and stick it in the freezer for at least 15 minutes. You want that thing COLD. Also, you want to start with really frozen ice cream.
-
Once ice cream is frozen solid, place the carton sideways on a cutting board and cut the entire carton full of ice cream into 3/4 inch slices using serrated knife.
-
After each slice, peel away the cardboard and use the cookie cutter to make your Mickeys.
-
As soon as the Mickeys are cut out, place them on cold cookie sheet and insert popsicle sticks as far as you can without ruining the shape of your Mickey. Because the ice cream melts quickly, you may want to stick them back in the freezer in between cutting your layers.
-
Once the Mickeys have all been cut out and have their sticks in place, stick them back in the freezer and let them set up for at least 30 minutes.
-
Melt an entire bag of your favorite chocolate chips for about two minutes on a low setting, stirring every 30 seconds to avoid burning.
-
Once the chocolate chips are smooth, add 3 tablespoons of coconut oil until the oil and chocolate are combined.
-
Let the chocolate cool to room temperature while stirring occasionally. You want the chocolate to be cool enough that it doesn't melt your Mickeys and soft enough to dip your ice cream in to cover the ears. When it gets to this point, you are good to start dipping.
-
Dip your Mickey Mouse ice cream bars one at a time into the chocolate and place them onto a clean sheet of wax paper. The chocolate sets up pretty quickly and you should be good to start enjoying your Mickeys after about 20 minutes in the freezer.
When you’re ready to enjoy a Mickey Mouse ice cream bar at Disneyland, let us know! Our agents would love to help you book the perfect Disneyland vacation. Book directly at www.getawaytoday.com or call our agents at 855-GET-AWAY. Be sure to mention Or So She Says and use promo code: OSSS10 to save an extra $10 off our already discounted Disneyland packages. We’ll see ya real soon!

Cars Land Churros – How to Make Your Own at Home

Disneyland’s Bengal Barbeque Recipe Round Up

Easy and Yummy Lime Mickey Recipe

DIY Night Blossom Drink for Avatar Night
![]()