I’m a huge Harry Potter nerd year round, but during Fall, my passion for all things Potter is magnified. (Because, hello, wizards and witches and magic.) I’ve even brainwashed my children into Harry Potter fandom, by encouraging them to dress up like characters from the books for Halloween. I’ve sewn them Hogwarts robes, and made Harry Potter wands, which actually they (okay, we) play with all year long. I’ve been crafting up a storm and I thought maybe I’d share with all of you how to make these Harry Potter knockoff wands. I know I can’t be the only Potter nerd out there. They are SUPER easy and fun to make, and the kids can help!
Realistic DIY Harry Potter Wands for Kids (Easy Hot Glue & Dowel Tutorial)
These DIY Harry Potter wands are surprisingly simple to make and look very authentic. Not to mention that they’re sturdy and can last for years and years. They’re fun to make for a family night, for a birthday party, or for Halloween costumes. I hope you enjoy this simple and fun craft.
Materials Needed for Realistic Wands
Wooden craft dowels
Hot glue gun
Glue sticks
Wood carving knife (optional)
Sand paper/brick sander (optional)
Acrylic paint
Craft paint brushes
Clear gloss acrylic spray paint (also optional)
How to Make Realistic Harry Potter Wands: Step-by-Step Guide
Step 1: Round and Shape the Wand Tip
Start by carving down one end of the wooden dowel, then sand it smooth. This rounds off the flat “pointing” end to make it look like a real wood-turned wand. While this step is optional, taking the extra minute to do this makes the final result look much more authentic than a blunt stick.
This picture above shows the difference between the cut/sanded ends vs natural ends. Again, totally unnecessary, but it makes for a nice touch.
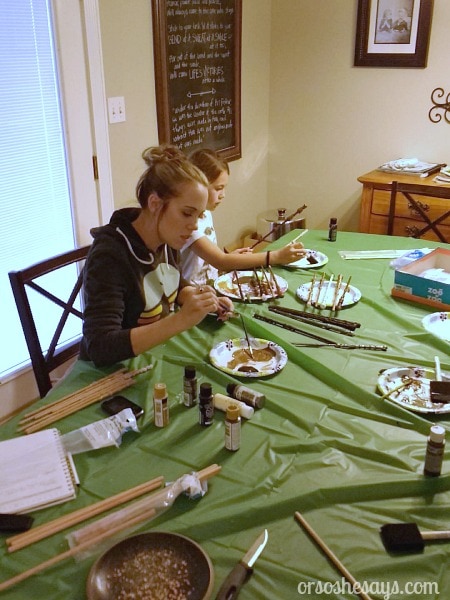
Step 2: Create the Wand Handle and Texture with Hot Glue
Heat up your glue gun and start sculpting the handle. This is the most creative part! Slowly apply the glue to the dowel, twisting the stick as you go to create 3D effects.
Pro Tip: Don’t rush! Apply a layer, let it cool and harden, and then apply another layer on top to build volume. If you try to do it all at once, the glue will just drip.
If you need inspiration, search for “Harry Potter wand replicas” to see how different characters have different handles (like the knobs on the Elder Wand or the vine texture on Hermione’s).
Then, if you’re like me, you can let your glued, half-completed wands sit for a few weeks before moving onto the next step…
5 Easy Wand Hot Glue Gun Patterns
The Spiral: Twisting the glue down the shaft.
The Vine: Organic, wavy lines resembling Hermione’s wand.
The Knobby Handle: Big globs at the base for a grip (Elder Wand style).
The Ringed Handle: distinct rings stacked on the handle.
The Cobweb: Pulling thin strands of glue for texture.
Step 3: Paint the Wands for a Realistic Wood Effect
Now it’s time to paint! For the best results, use acrylic craft paints. We stick to authentic colors like dark browns, blacks, bronze, and metallic gold to give them that antique wizarding world look.
How to paint: Start with a dark base coat (like brown or black) and let it dry. Then, lightly brush on lighter colors or metallics over the raised hot glue textures to make the details pop.
Of course, if the kids are helping, feel free to stray off the beaten Potter path with bright colors—but the metallics are what really make them look magical!
Step 4: Seal the Wands for a Glossy, Durable Finish
Once the paint is completely dry, it’s time to seal your work. Move your wands to a protected, well-ventilated area (outside is best).
Use a clear acrylic spray paint to give them a protective coat. This prevents the paint from chipping off the hot glue and gives the wands a professional, glossy final touch.
Tip: Spray one side, let it dry completely, and then rotate the wands to spray the opposite side. If you prefer a non-shiny look, you can use a “Matte” sealer instead of “Gloss.”
And that’s it! These make a great addition to a Halloween costume, or a great accessory if you’re going to Universal Studio’s Wizarding World of Harry Potter any time soon. My kids want to do a little “Harry Potter” stand in the front yard in a few weeks to raise a little money for their after-school activities, so that’s why we made so many. I’m considering making some “chocolate frogs” to go along with the wands.
Frequently Asked Questions on Wand Making
What kind of paint do you use on hot glue wands? Acrylics, but mixing glue with paint can add durability. Sealing it helps protect the paint.
How do you make a Harry Potter wand look real? Layering paint — start dark, dry brush lighter colors.
Can I use chopsticks instead of dowels? Yes, but dowels last longer. Chopsticks are often tapered too aggressively or are too short/thin. Dowels feel more “real” and sturdy.
Bonus Activity: How to Play a Wizard’s Duel
Now that your wands are dry, it’s time to test them out! This simple “Wizard’s Duel” game is perfect for Harry Potter birthday parties or playdates. It works best with groups of three or more.
The Rules of the Duel:
The Etiquette: Everyone stands in a circle with their backs to one another. Hold your wand ready and bow (wizards must always be polite!).
The Draw: Together, count aloud to three. On each count, take one step away from the center of the circle.
The Cast: On the count of three, everyone spins around, points their wand at another player, and yells a spell!
The Result:
If one person points at you, you are out (or lose a point).
If nobody points at you, you are safe!
Goal: Be the last wizard standing or the first to reach 10 points.
Popular Spells to Use:
Expelliarmus! (Disarming Charm)
Stupefy! (Stunning Spell)
Petrificus Totalus! (Body-Bind Curse)
Avada Kedavra! (Only for the bad guys!)
It sounds simple and silly (and it is) but even my 2-year-old can play (though her spells come out on a 2-second delay, as she repeats a spell that she hears come from one of us) but everyone loves it!
I hope that you and your family enjoy making and casting spells with these wands as much as we have! These are great to go with a Halloween costume, if you’re going to Universal Studio’s The Wizarding World of Harry Potter. It would make a great party gift if you have a child who is a Potter fan, or even a great craft to do at a party!