
Hello lovelies! Are you loving the new digs here at Or So She Says as much as I am? Kudos to Mariel and her team for this stellar blog makeover!
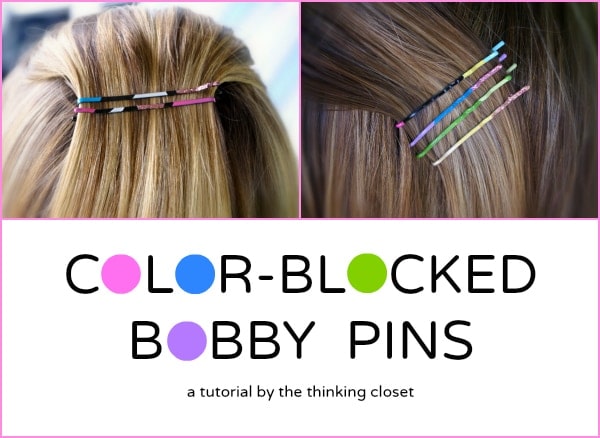
Speaking of makeovers…you’ll never guess what else got a makeover recently…my bobby pins! Didn’t know it was possible, did you? Well, it is. And it’s super easy, too. Painter’s tape and nail polish are all you need to transform plain ole bobby pins into trendy color-blocked hair accessories. They’re the perfect compliment to your bright n’ bold spring outfits!

“How did this marvelous idea come about?” you ask.
Well, I’ll tell you. I know where my skills lie and hair-styling is not one of them. I’ve always been a plain and simple hair-clip-and-bobby-pins kinda gal. But if my hair-styling is going to be plain and simple, why not go for a bright n’ bold statement with my hair accessories? And I right or am I right?
Thus, the color-blocked bobby pins were born.
So, I’m going to walk you through perhaps the easiest tutorial I’ve ever created, so that you, too, can give your bobby pins some pizzazz this spring. They also make for great gifts for your friends with birthdays coming up…or a fun activity to do at a girl’s slumber party!
TUTORIAL:
Step 1. Gather your supplies. Raid your nail polish stash for some bright n’ bold colors. Don’t hesitate to throw glitter nail polish into the mix for some sparkle, as well as black and white for some contrast.

Collect some old bobby pins or pick up new ones at the dollar store. Roller pins are great to work with for their flat surface. And bonus points for finding bobby pins that already boast a base level of color. That’ll make your job even easier! You’ll also need some painter’s or masking tape and a pair of scissors.

Step 2. Tape off some geometric patterns. Make sure the bobby pins are on cardboard or cardstock with a little bit of space in between them so that they don’t stick together when applying the nail polish. Then, cut some strips of painter’s tape and start creating geometric patterns across the surface of your bobby pins. There’s really no right or wrong here, so have fun experimenting with different shapes. Be sure to press down firmly on the tape to create a strong seal, especially over the ridges. (I could have avoided some color-blocked bobby pin casualties if I had been more fastidious with that part.)

Step 3. Painting party! Get some good air ventilation going on and have a field day painting alternating colors of nail polish in each section. Be careful not to apply the nail polish too heavily when it comes to the bobby pins with ridges or you may find that it leaks under the tape…not that I would know that or anything. {Wink.}


Step 4. Once the nail polish has dried, peel away the tape to reveal your color-blocked bobby pins! Try not to scream too loudly when you see how cute they are. {Grin.}


They look great on their own or stacked in a bunch! So, pair them with a bright n’ bold springy outfit and hit the town.

Quick & Easy Gift Ideas
Color-blocked bobby pins make great gifts, too! I sent some in a card to my friend Justine for her 30th birthday. {Happy Birthday, Jaybird!} They slide right inside the envelope. Easy peazy.

For more quick and easy gift ideas, visit me over at The Thinking Closet to check out these tutorials:
- Burp Cloth Tutorial for the Beginner Sewist
- Shadow Box Anniversary Gift
- Practical Gift Ideas for Moving & Housewarming

Happy Monday, everyone. May your spring be bright, bold, and full of color!
For gift ideas for everyone on your list, check out the Gift Ideas tab and be sure to pin Gift Idea Central, to keep the whole collection in one place.