Or so she says...

Family Fun, Favorites, Food, and Faith

  • Home
  • Categories
    • Gift Ideas
    • Family
    • Recipes
    • Education
    • Faith & Inspiration
    • Holidays
    • Vacation
    • Crafts
    • Health
    • Home & Garden
  • About
    • OSSS Team
    • Media & Partners

August 28, 2012 by Mariel

Blog Tips: Easily Adjust Picture Size in Blogger

This post may contain affiliate links. For more information, see the disclosure policy.
  • Facebook
  • Twitter
  • Email

One of the most helpful blogging tips I ever learned was how to easily adjust the size of my pictures in Blogger.  So, today I thought I would share it with you!

I was too lazy to open every picture with Photoshop and adjust the size, so I would just go with the default sizes offered by Blogger: small, medium, large, or x-large.  The trouble is, large was always too small, but x-large was WAY too large.  Ugh.

Take a look…

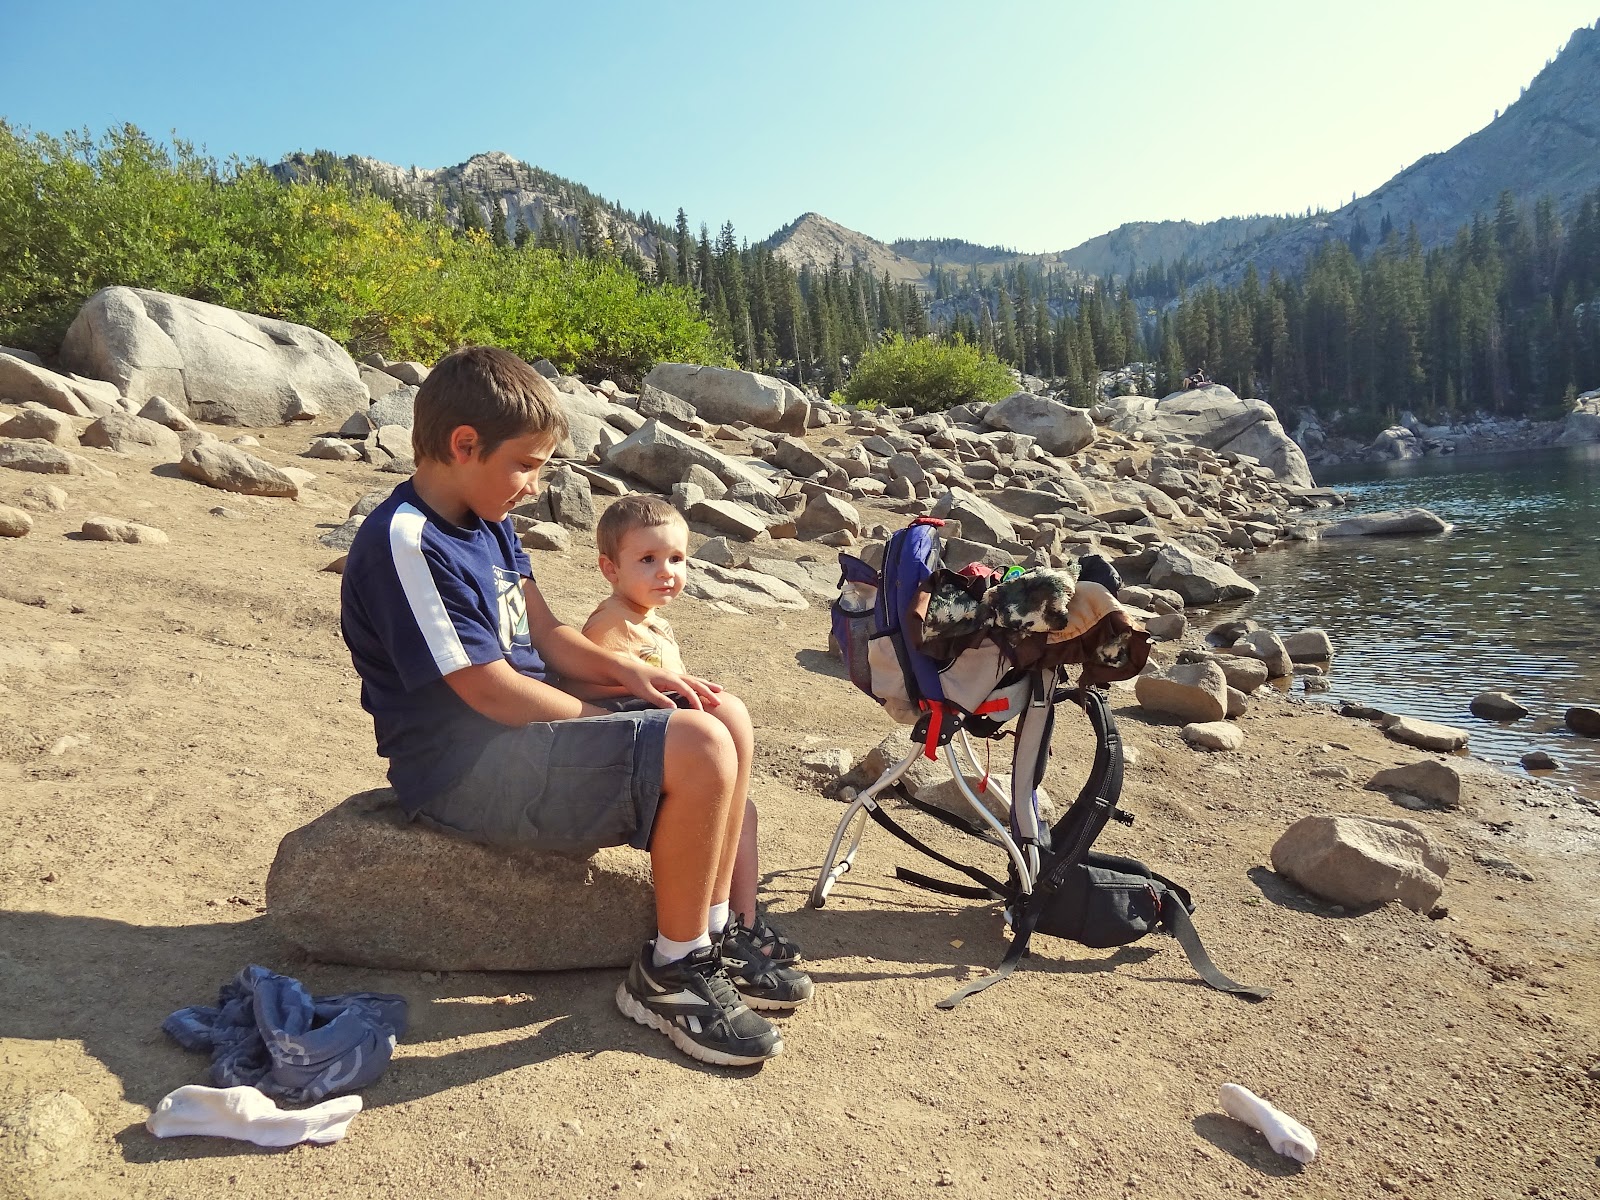
Here’s size large…it’s fine, but a little bigger would make it easier for y’all to see it and it would fit nicer in this content column. (BTW, this is a pic from this weekend.  We took the kiddos on a hike up to Lake Mary, here in Utah.)

 And, extra large just puts it right off the page.  Eeek!


So, what to do?  I mean, besides opening up your photo editing software?  Cause that’s SOOOO HARD.  And, you can try to goof around in the html and adjust the height/width, but chances are that your picture will end up distorted.  Well, this solution is easy.  Just switch over to the html view (the options are in the top left of your screen while editing your Blogger post.  You’ll see ‘compose’ and ‘html’.)  Don’t be scared, my friends, but you’ll be looking at a page full of code.  It’s okay.  The more you stare at it, the more stuff just starts to make sense.

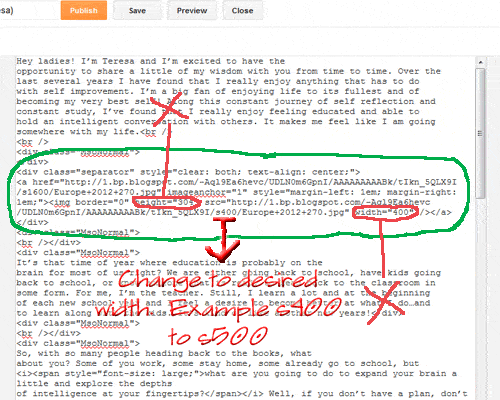
Anyway, so after you’ve uploaded the pictures you want under the ‘compose’ layout, and switch to html view, you’ll want to find the code for your pictures.  Take a little gander…you’ll see the text you typed, and the spot where you have a picture, well it looks different…take a look at mine, well Teresa’s post from the other day.


See the text paragraph at the top?  Then the part I circled is a bunch of mumbo-jumbo, then below is more text.  Well, in that mumbo-jumbo, you’ll notice words like imageanchor, height, width…things that make you think PHOTO.

Once you find the photo section, find the spot that says height (as circled below) and delete it.  Find the spot that says width, delete it.  Delete everything I have circled in red.  THEN, in between those numbers you’ll see an address.  In the middle of that address is an ‘s’ followed by a number.  That number is the width of your picture.  Change it to what you want.  For my blog, I like a width of 500.  If you don’t delete the height and width numbers and change the ‘s’ number, your picture will be all whacky.  Same goes for trying to adjust the width and height numbers…unless you really know your stuff.  It’s not as easy as just adding/subtracting the same amount from each number.

Believe me, it’s easy.  And, once you do it for the first time, it’s a breeze after that!

Custom sized picture (easy and non-distorted. yay!):

So, if you’re interested in more blogging tips, here’s a couple:

Top 10 Blogging Tips for Beginners
Adding a Favicon to Your Blog
Photobucket

 * Oh hey, have you entered to win the happy yellow bike???  It’s awesome.  You must.

  • Facebook
  • Twitter
  • Email
❮❮ Previous Post
Next Post ❯ ❯

Comments

  1. janel says

    August 28, 2012 at 7:17 pm

    What a helpful tutorial. Thanks!

  2. Three Sheep Studio says

    November 13, 2012 at 8:58 pm

    This was an amazing post about changing the picture size on your blog.
    I was afraid to do it…but your tutorial was encouraging and straight forward.
    Wow, what a difference a picture makes.
    Thank you !
    Rose

  3. Arun says

    May 31, 2013 at 9:41 am

    Hai Mariel,
    Yeah that’s easy, but after altering the height and width of the image, the image is getting blurred, as if i expanded a well expanded image further.

    • Mariel says

      May 31, 2013 at 3:07 pm

      I’m not on blogger anymore, so it’s hard for me to look into this too much. Are you trying to enlarge your image bigger than it is? That’s all I can think of. I never had that problem. Sorry I’m not more help!

  4. Layllah says

    June 27, 2013 at 8:19 pm

    This was AWESOME…quick and easy!! Thank you 🙂

  5. J. Bavard says

    July 12, 2013 at 9:16 pm

    Thanks so much. This is exactly what I needed and it actually worked!

  6. Liberti Zimmerman says

    August 16, 2013 at 2:56 pm

    Thank you so much! I was trying to add a word cloud to a blog and I needed it to be x-large not just large so that the words could be clearly read. And you’re right, trying the alter the picture itself is sooo hard. I followed your instructions and changed the width to s570 and voilà! Thanks again!

    • Mariel says

      August 16, 2013 at 6:01 pm

      You bet!

  7. kj wilson says

    August 28, 2013 at 5:22 am

    Thank you for showing me how to adjust my cartoons. I am new to this blogging lark but I shall persevere and hope to become as savvy as your goodself.

  8. Khamsi Abdullah says

    September 5, 2013 at 11:24 am

    Thanks so much for your tutorial. 🙂

    • Mariel says

      September 5, 2013 at 12:48 pm

      You’re welcome!

  9. Leanne says

    October 20, 2013 at 8:17 am

    Thanks SO much for this, I have been getting so annoyed trying to fix my photos to a good size. This is brilliant, GENIUS! Haha.

  10. Lupin says

    December 3, 2013 at 5:41 am

    I just wanted to say a big thank you for this post – just what I needed to make the pics on my blog a bit bigger 🙂

    I’ve discovered there’s an even easier way to edit the html – if you set the pics to “original size” just before you switch to html view, there’s no height= / width= text to delete, you can just change the desired size. Saves a lot of time if you include lots of photos in your posts!

    • Mariel says

      December 3, 2013 at 10:12 am

      Thanks so much!

Categories

Topics

The Rare Newsletter

It doesn't happen very often, but when it does... it's good!! Favorite things, great ideas, and all things "FAMILY."

My Beliefs

Free Book of Mormon Offer

10 Reasons I Love Being a Latter-day Saint

The Church of Jesus Christ of Latter-day Saints

Affiliate Disclosure

‘Or so she says…’ is a participant in a variety of affiliate programs, including the Amazon Services LLC Associates Program, an affiliate advertising program designed to provide a means for sites to earn advertising fees by advertising and linking to amazon.com. Read more in the Disclosure, including info on Adthrive, the publishing network for this blog.

10 Most Popular Posts

  • 16 Teenage Birthday Party Ideas
  • 26 Camping Hacks You Need to Know
  • Best Products for Thinning Hair
  • Swiss cheese Chicken Easy Dinner
  • Would You Rather ~ Scripture Edition Game
  • Cute Bun Hairstyles for Girls
  • Over 100 Family Movie Ideas
  • The Ultimate Collection of Scriptures on Faith
  • Foods to Freeze Dry ~ Ultimate List
  • 30 Books to Read Out Loud to Older Kids


  • Disclosure Policy
  • Privacy Policy

© 2018 Or So She Says... By: Pretty Darn Cute Design