

I knit constantly, ride my bike everywhere I go, and spend a lot of time cooking and playing with my cats. I am also fortunate enough to have a good-humored husband who doesn’t mind crafty messes scattered throughout the house.
Embroidery is a beautiful, versatile craft that requires just a few basic supplies. I have created this simple project with step-by-step instructions perfect for beginners or embroidery aficionados! It’s a cute little piece made using two basic stitch techniques and hung in a wooden hoop. It’s perfect on your wall or as a gift!
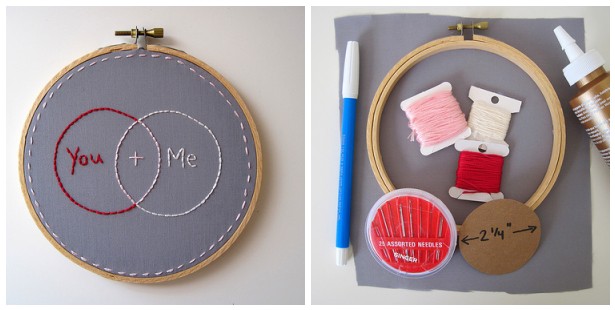
You will need to gather a few supplies:
a piece of cotton fabric 8″ x 8″ (mine is gray broadcloth)
a 5″ wood embroidery hoop
sewing needle and scissors
3 colors of embroidery floss (I’m using red, pink, and white)*
a circle template cut from cardboard or card stock (I used a cereal box) measuring 2 1/4 ” in diameter
water soluble fabric marker
glue
*embroidery floss comes with six strands. For this project, we will only be using three strands at a time. Cut a length of floss and divide it into two sets of three strands.
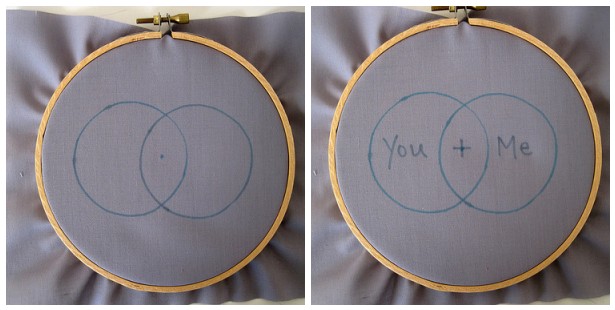
First, place your fabric in the embroidery hoop and tighten the closure. Use your fabric marker to make a small dot in the center of the hoop. Line up the edge of your circle template with the dot. Now, slide the template over so that about 1/4 of the circle is overlapping the center mark. Trace the circle with your fabric marker. Repeat this process on the other side of the fabric to create two overlapping circles.
Next, use your fabric marker to write the text “You + Me” in the circles (refer to the photo for placement). Use your best handwriting! : )

Then, thread your needle with three strands of red embroidery floss and tie a knot at the end. You will trace the line for the first circle using back stitch.
Here is the recipe for back stitching: Make a single, straight stitch. Continuing along your line, come up one space ahead and bring your needle back down into the same hole at the end of the stitch you just made. You are taking your stitch back to the end of the one you just made… that’s back stitching! (See the photo above right for a visual.)
When you reach the end of the arc for the first circle, knot off your thread by passing your needle under your last stitch and leaving a small loop. Pass your needle through this loop and pull tight. (See the photo above left for a visual.) You can also secure your thread by weaving it through several stitches on the back side of your work.
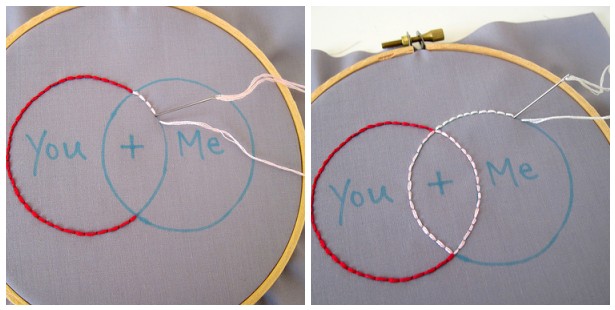
Continue using back stitch to trace the center shape created by the overlapping circles. I used pink for this part.
Next, you guessed it, use back stitch to trace the second circle with your white thread. Red and white make pink!
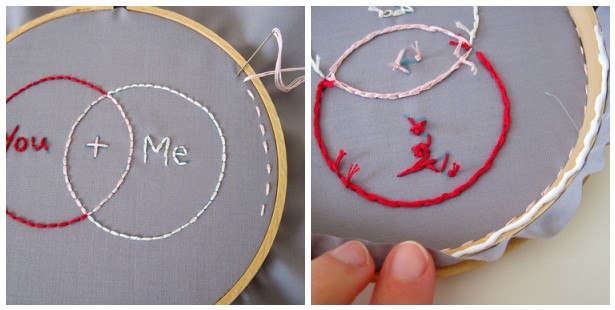
Now it’s time to go back with each color and back stitch the text. In keeping with my theme, I used red inside the red circle, pink in pink, and white in white.
When you have finished the embroidery it’s time to glue your fabric to the hoop. Using your scissors, trim your fabric neatly around the hoop leaving just enough to fold over the edge. Place a line of glue all the way around the top edge of the hoop and press the fabric into it. Flip the piece over and let it dry.
Now your little embroidery is ready to hang or give as a gift!