Or so she says...

Family Fun, Favorites, Food, and Faith

  • Home
  • Categories
    • Gift Ideas
    • Family
    • Recipes
    • Education
    • Faith & Inspiration
    • Holidays
    • Vacation
    • Crafts
    • Health
    • Home & Garden
  • About
    • OSSS Team
    • Media & Partners

April 14, 2010 by Mariel

DIY Silverware Wind Chimes (she: Roberta)

This post may contain affiliate links. For more information, see the disclosure policy.
14794 shares
  • Facebook
  • Twitter
  • Email
I am so happy to be posting again on Or so she says…Here I am in case you forgot. My name is Roberta and I claim to be one of many BFF’s of Mariel’s childhood friends. Since she has lived all over the U.S., I am sure there are many of you out there. I am the NY BFF. I LOVE wind chimes, they are so beautiful, and with the warm spring weather arriving it just makes me in the mood to hear their awesome tinkle tinkle. I was at an antique shop and saw silverware wind chimes. I fell instantly in love! Silverware makes a beautiful sound when it’s in the wind brushing against each other. Unlike some other wind chimes that are very loud and annoying and could get you in trouble with the neighbors. Like the traditional ones you are probably thinking of that are silver, hollow, long, and tubular. Those are killer on the ears! Wood chimes are nice on the ears also.  My front porch would be loaded with wind chimes if we lived in the country.
silverware wind chimes
After I bought my antique silverware wind chime, a thought occurred to me! “Hey I can make these myself!” And so I have! They are great as gifts and cost next to nothing! Mine hang beautifully in my kitchen. I gave my sister one and hers hangs on her back patio, which she mentions she loves the sound they make, it is such a unique sound. So today I am going to teach you how to make your very own silverware wind chime.
The best place to purchase silverware is a thrift store! They have loads and loads of it! Remember the more decorative, older and rustier the better.

DIY Silverware Wind Chimes

Materials Needed: Five forks, one spoon, needle nose pliers, regular pliers, and fishing line.
DIY your own silverware wind chimes! www.orsoshesays.com #diy #windchimes #silverwarewindchimes #homedecor #crafty
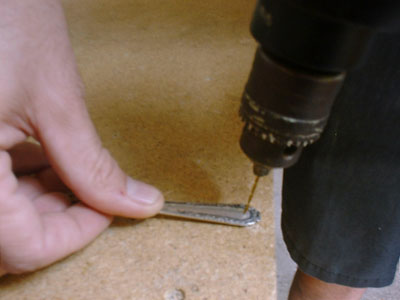
Drill a hole in the end of the handle of each piece of silverware.
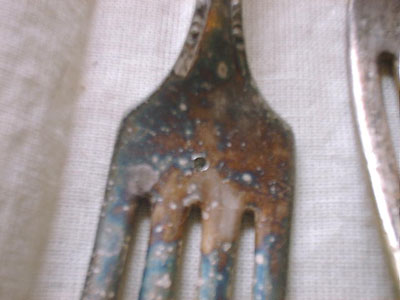
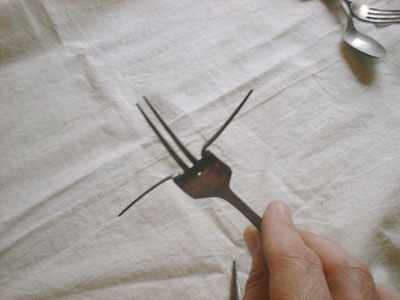
Choose one fork to be the centerpiece fork, the fork from which all the other forks will dangle. Drill a hole into the smooth part of the fork above the prongs.
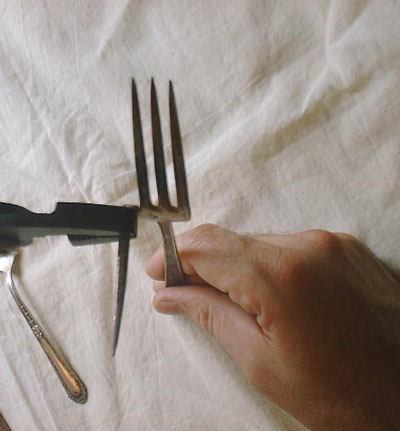
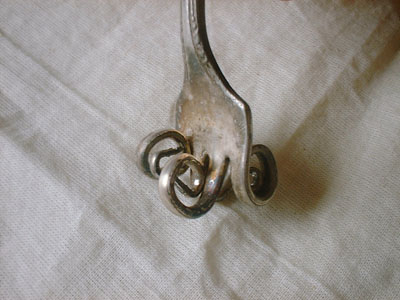
Take the centerpiece fork and bend one of the outermost prongs back using the regular pliers.
DIY your own silverware wind chimes! www.orsoshesays.com #diy #windchimes #silverwarewindchimes #homedecor #crafty
Bend the other outermost prong in the opposite direction.
DIY your own silverware wind chimes! www.orsoshesays.com #diy #windchimes #silverwarewindchimes #homedecor #crafty
Then bend the same prongs again so they are pointing out to the sides.
DIY your own silverware wind chimes! www.orsoshesays.com #diy #windchimes #silverwarewindchimes #homedecor #crafty
With the pliers bend each of the innermost prongs in opposite directions.
Make sure the prongs are all perpendicular to the fork handle and each other.
DIY your own silverware wind chimes! www.orsoshesays.com #diy #windchimes #silverwarewindchimes #homedecor #crafty
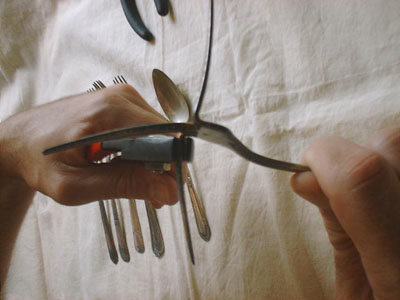
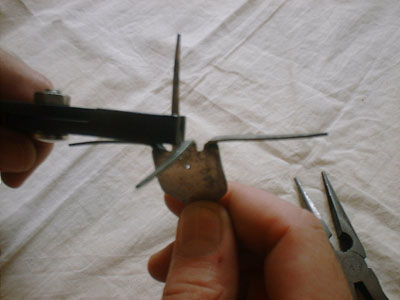
With needle nose pliers, curl the end of each prong one rotation only and set aside.
DIY your own silverware wind chimes! www.orsoshesays.com #diy #windchimes #silverwarewindchimes #homedecor #crafty
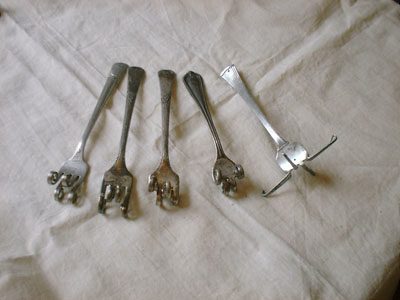
Start curling the prongs of the next fork using the needle nose pliers.
DIY your own silverware wind chimes! www.orsoshesays.com #diy #windchimes #silverwarewindchimes #homedecor #crafty
You can curl the prongs completely up, partway up, or in opposite directions. Experiment and see what you like best. Don’t make the curls too tight, though. I have found that looser curls make a better sounding wind chime.
DIY your own silverware wind chimes! www.orsoshesays.com #diy #windchimes #silverwarewindchimes #homedecor #crafty
Repeat with the remaining forks.
DIY your own silverware wind chimes! www.orsoshesays.com #diy #windchimes #silverwarewindchimes #homedecor #crafty
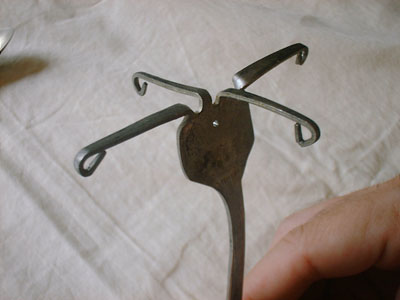
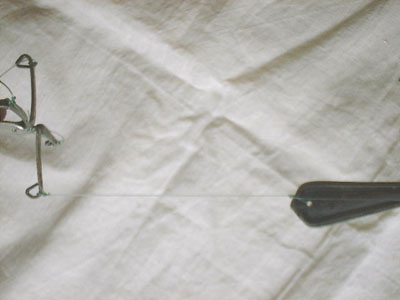
Cut four 10-inch pieces of fishing line (you can also use thin ribbon)and tie them onto the curled ends of each prong of the centerpiece fork with really good knots. Also tie one last piece of 10 inch fishing line through the hole between the two center prongs.
DIY your own silverware wind chimes! www.orsoshesays.com #diy #windchimes #silverwarewindchimes #homedecor #crafty
About four inches down from the tip of the fork prongs, tie on your first fork onto the fishing line. Make sure the curly prongs of the forks are even with each other by dangling your wind chime above the table and letting the fork prongs line up by resting on the table.
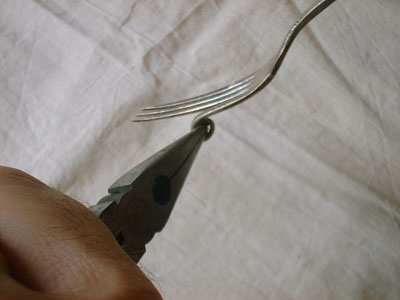
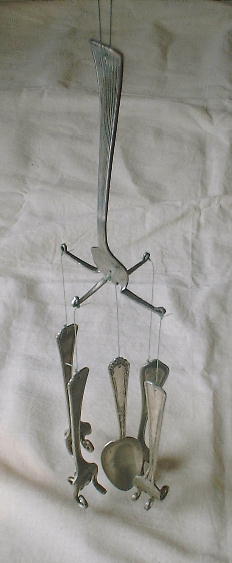
Finish off by tying the spoon to the middle of one of the centerpiece fork prongs and checking to make sure it lines up with the forks. Thread a length of fishing line through the hole in the handle of the centerpiece fork and tie it up outside where you’ll be able to enjoy it.
silverware wind chimes

Another cute, easier wind chime I have done is curling the prongs on 1 fork and hanging 4 spoons from it. The spoons are close together but it still sounds and looks pretty. You can get very creative with it by attaching colorful beads. Beware of knives they don’t work very well, they are very hard to pierce the handle, we have ruined quite a few drill bits trying. There are several pretty and creative silverware wind chimes ideas on the internet, here’s a couple favorites…

 Have fun!
-Roberta

Supplies for making silverware wind chimes:

Stanley 84-096 5-Inch Needle Nose PlierStanley 84-096 5-Inch Needle Nose PlierStanley 84-096 5-Inch Needle Nose PlierStanley 84-096 5-Inch Needle Nose PlierStanley 84-096 5-Inch Needle Nose PlierStanley 84-096 5-Inch Needle Nose PlierWORKPRO 7-piece Pliers Set (8WORKPRO 7-piece Pliers Set (8WORKPRO 7-piece Pliers Set (8IRWIN VISE-GRIP North American Lineman's Pliers, 9-1/2IRWIN VISE-GRIP North American Lineman’s Pliers, 9-1/2IRWIN VISE-GRIP North American Lineman's Pliers, 9-1/2Beadsmith Illusion Monofilament Bead Cord .010 In 6 lb 164ftBeadsmith Illusion Monofilament Bead Cord .010 In 6 lb 164ftBeadsmith Illusion Monofilament Bead Cord .010 In 6 lb 164ftBLACK+DECKER LDX120C 20V MAX Lithium Ion Drill / DriverBLACK+DECKER LDX120C 20V MAX Lithium Ion Drill / DriverBLACK+DECKER LDX120C 20V MAX Lithium Ion Drill / Driver


More DIY posts you’ll love:

Homemade Halloween Decorations

Paint Swatch Flag Decor

Add Color to Your Decor on a Budget

14794 shares
  • Facebook
  • Twitter
  • Email
❮❮ Previous Post
Next Post ❯ ❯

Comments

  1. Belinda says

    April 14, 2010 at 12:16 pm

    Very Funky. Might have to give this a go 🙂

  2. Belinda says

    April 14, 2010 at 12:16 pm

    Very Funky. Might have to give this a go 🙂

  3. mub says

    April 14, 2010 at 12:53 pm

    This is so much fun! I’ll need to keep my eyes out for cool silverware at the (subpar) thrift store. Oh how I long for DI here *L*

  4. Lorie says

    April 14, 2010 at 12:57 pm

    That is so fun!

  5. Cathie says

    April 14, 2010 at 1:30 pm

    I LOVE this!

  6. Reb says

    April 14, 2010 at 1:44 pm

    That is just cool. Very creative and downright thrifty!

  7. Angie says

    April 14, 2010 at 1:45 pm

    These are so cool. I’m totally wanting one…pick me!

  8. Mariel says

    April 14, 2010 at 1:48 pm

    YOU are awesome! I love the addition of the beads too…

    Great job, once again!

    I love this and love you, my NY BFF!

  9. Lacking Productivity says

    April 14, 2010 at 1:50 pm

    When I read the title, I thought they would be totally hoaky…but they are kinda cute…I dig it.

  10. Allie's Antics says

    April 14, 2010 at 2:04 pm

    Very cute! I really like the ones with beads.

  11. mommy2luke2008 says

    April 14, 2010 at 2:19 pm

    Very cool!! You make it sound so easy!! My mother would love these, can you say Mother’s Day present???

  12. JEREMYandCHELSEA says

    April 14, 2010 at 2:27 pm

    i love this!, I think I my try this in the near future!

  13. Kalynne says

    April 14, 2010 at 2:40 pm

    I’ll need to go find silverware to give this a try. What a unique gift yet so creative and cute!

  14. Brooke says

    April 14, 2010 at 2:45 pm

    So fun and original!

  15. Amanda and Chad says

    April 14, 2010 at 3:32 pm

    love this creative idea!

  16. Karen J says

    April 14, 2010 at 3:33 pm

    Guess where I’m going today? To the local Goodwill (no DI by us) and pick up some forks. 🙂
    Love this idea!!!

  17. The Stewarts says

    April 14, 2010 at 4:07 pm

    This would make a great Mother’s Day gift for my mom. She LOVES wind chimes and antique-type stuff.

    Julina

  18. Emilee says

    April 14, 2010 at 4:34 pm

    What a fun project. I am going to give it a try!

  19. Torgersons says

    April 14, 2010 at 4:35 pm

    Please pick me to be the winner! We just bought a fun old house from the 60s that would go perfectly with the a wind chime on the back porch. Yay!

  20. bre says

    April 14, 2010 at 4:49 pm

    Super cool idea, an d they look somewhat easy to make! 😀

  21. Quilter family says

    April 14, 2010 at 5:11 pm

    I have to admit, I was a little sceptical at first, but after seein the end result I am throughly impressed! Those are beautiful! I’d love to be entered into the giveaway!

    Melissa
    [email protected]

  22. Cristi says

    April 14, 2010 at 5:44 pm

    I love these. We love wind chimes at our house and one of these would be a great addition.

  23. Ashley says

    April 14, 2010 at 6:31 pm

    This is such a good idea! What kind of drill & drill bit did you use?

  24. Bugs and Begees says

    April 14, 2010 at 6:50 pm

    Great idea… Might have to use some of my “old” silverware to do this. Then I can get that new set I’ve been eyeing for some time!

  25. Torn says

    April 14, 2010 at 7:23 pm

    What a great idea!!! I have some mis matched silverware that was my grandmothers, this would be a great project with my girls and a really perfect teacher gift!

  26. al says

    April 14, 2010 at 7:35 pm

    These are so different! Enter me please!

  27. Christy says

    April 14, 2010 at 8:06 pm

    This looks like a really fun project. Thanks for the how-to.

  28. Somer says

    April 14, 2010 at 8:20 pm

    Hi Roberta- its your neighbor. What a fun project, I’ll have to come see your wind chimes.

  29. Sher says

    April 14, 2010 at 9:01 pm

    Very cool!
    I like that you use vintage looking silverware. Are they really old, or did you do something to make them look that way?
    So, so cute!
    Since I’m not the least bit crafty, consider this my entry into your giveaway.
    I hope I win!!

  30. joycegardner2 says

    April 14, 2010 at 10:20 pm

    I absolutely love these chimes, especially the one you did with a butter dish in addition to the silverware. Your photos and directions are very well done, too. I am not particularly adept at craft type activities, but you explain it so well that I’m sure even I could be successful. Thank you so much for sharing this great idea.

  31. Tracey says

    April 14, 2010 at 11:17 pm

    Very fun! I have wanted one of these for a long time!

  32. Roberta says

    April 15, 2010 at 3:53 am

    You can oxidize REAL silver. But we just used regular stainless steel silverware, and to get the antique look we put them in our wood burning fire pit! This really does the trick in making them look old! The heat makes the steel so hot it creates a rainbow of colors on the stainless steel. Use caution when doing this!

  33. Shannon says

    April 15, 2010 at 4:12 am

    Love windchimes!!! These are soooo fun looking!

    Shannon HAymore

  34. Vickie says

    April 15, 2010 at 1:06 pm

    That is so cool! Please count me in. Thanks.

  35. Jessica says

    April 15, 2010 at 2:52 pm

    Such a cute idea! Thanks Roberta!

  36. Suze says

    April 15, 2010 at 4:48 pm

    Wow. This is something I could actually make!

    I love windchimes and live out in the country, so they won’t annoy my neighbors, no matter how loudly they chime!

    Awesome tutorial Roberta. Thanks for sharing.

  37. Ľubaša says

    April 15, 2010 at 4:52 pm

    I ve never seen anything like that. Great idea. Congrats.:-)

  38. Carol says

    April 15, 2010 at 6:23 pm

    I absolutely adore your wind chime! I love eclectic, whimsical crafts! It’s so sweet of you to give one away!

  39. MariaJoy says

    April 15, 2010 at 8:06 pm

    Very cool!! I will have to share this with my sister!!

  40. Amanda says

    April 17, 2010 at 6:29 pm

    I’m pretty sure my little apartment would be the coolest in Nashville with one of these wind chimes!

  41. Judah and Amanda says

    April 18, 2010 at 10:34 pm

    Cute! Good way to repurpose those items, too.

  42. moritz says

    July 13, 2010 at 5:10 pm

    This comment has been removed by a blog administrator.

  43. Judi says

    February 11, 2016 at 8:19 am

    The picture that led me to these instructions had a wind chime with a bobeche that the forks are hanging from. I was wondering where you source those from?

    • Mariel says

      February 13, 2016 at 9:44 pm

      I’m not sure… I’m sorry. I removed any pictures from this post where the links back weren’t valid anymore or the source wasn’t known.

  44. Sue says

    October 13, 2018 at 9:21 am

    I have been making these since 1988. I still enjoy making them today, but silverware is getting harder to find. Cost a fortune to purchase used silverware. Beautiful work Roberta.

Categories

Topics

The Rare Newsletter

It doesn't happen very often, but when it does... it's good!! Favorite things, great ideas, and all things "FAMILY."

My Beliefs

Free Book of Mormon Offer

10 Reasons I Love Being a Latter-day Saint

The Church of Jesus Christ of Latter-day Saints

Affiliate Disclosure

‘Or so she says…’ is a participant in a variety of affiliate programs, including the Amazon Services LLC Associates Program, an affiliate advertising program designed to provide a means for sites to earn advertising fees by advertising and linking to amazon.com. Read more in the Disclosure, including info on Adthrive, the publishing network for this blog.

10 Most Popular Posts

  • 16 Teenage Birthday Party Ideas
  • 26 Camping Hacks You Need to Know
  • Best Products for Thinning Hair
  • Swiss cheese Chicken Easy Dinner
  • Would You Rather ~ Scripture Edition Game
  • Cute Bun Hairstyles for Girls
  • Over 100 Family Movie Ideas
  • The Ultimate Collection of Scriptures on Faith
  • Foods to Freeze Dry ~ Ultimate List
  • 30 Books to Read Out Loud to Older Kids


  • Disclosure Policy
  • Privacy Policy

© 2018 Or So She Says... By: Pretty Darn Cute Design